As did a lot of people, I started making sourdough during Covid. My ‘Mother’ is now 5 years strong, and I refresh her and bake roughly twice a week. With two French men at home – my husband and son – we get through a lot of bread! I’ve had my share of failures, but a reasonable amount of wins. I’m pleased to say with patience my success rates have definitely improved and I’m sure with practice you’ll also nail it.
The ‘Mother’
Anyone who has baked sourdough will be in the know when I say ‘Mother’. For those who are new to sourdough then ‘welcome’ and fasten your seatbelt!! There is a whole new world and language to sourdough baking. I follow a large number of bakers online, from those with bakeries, to chefs, to home cooks. Everyone seems to have their preferred recipes, folding techniques, rising times, baskets, baking, and scoring methods… it’s a minefield.
In my recipe, I share with you the formula that works for me. It will no doubt be different for you and you’ll need to adapt as you go along. The temperature and humidity in your kitchen won’t be the same, so the timings will not be a science. Fundamentally, you need to get to know your bread. And pardon the pun, but the easiest way to do this is through the ‘kneading’. Or actually in the case of sourdough it’s really in the folding. I know some people will use a standing mixer and dough hook, and that’s absolutely fine. Homemade bread is homemade bread, and if you’re already using a gut-friendly ‘Mother’ as your raising agent, and no fast yeast, then I’m in your camp. But mixing by hand allows you to really understand your dough and adjust to the conditions.
How to start your ‘Mother’
Various sites and books talk you through how to make your initial ‘Mother’ or ‘Starter’. I would recommend Vanessa Kimbell, who is the founder of ‘The Sourdough School‘. Unless you are lucky enough to have a friend who is willing to gift you some of their ‘Mother’! Ironically, my Mum started her sourdough journey 4 years ago with some of my ‘Mother’ and she’s still baking regularly with hers!
How often do you need to refresh your ‘Mother’?
I try to refresh my ‘mother’ weekly. I’ve left mine to go on holiday for 3 weeks in the fridge and it’s been fine. It might take a little more coaxing, but you can soon revive it again. If your ‘mother’ looks as though it has separated (there is liquid on top of the doughy mix), you simply pour this away. The ‘mother’ should be absolutely fine underneath, and you can feed the starter as normal to freshen it, and off you go again. Only when it doesn’t have that tangy, slightly sour but not unpleasant smell should you throw it away and start again.
How often to bake?
Don’t be put off by the preparation time, the hands-on time is relatively minimal. I would however recommend that the day you make your bread you need to be around to show it the love and attention it needs – and in return, it will reward you.
This is my bi-weekly ritual I follow to get the best results in my kitchen when baking Sourdough. It’s a labour of love and therefore I normally make three loaves at a time (or I might be using the dough for pizza or focaccia) and freeze the loaves I know I won’t use in a few days. It freezes very well either whole or sliced ready to pop in the toaster.
Suggested timeline
Below is a rough schedule I follow. Some days there are distractions, and it doesn’t go to plan, but in an ideal world I try and follow the timeline as follows:
- 9am-midday day one – refresh ‘Mother’ with a 1:5:5 ratio. The timing will depend on the temperature. In the summer I won’t start until midday, but in winter I will start at 9am.
- 10pm day one – make leaven with a 1:4:4
- 7am day two – start making your sourdough
- 2pm day two – place in the fridge either for 5-6 hours or overnight
- 7/8pm day two – bake bread *
- or day three – bake bread *
* It depends on how quickly the dough has risen and/or how much time I have to bake in the evening or the following morning.
Flour
There is the age old saying that something is only as good as what you put into it. And bearing in mind that sourdough is literally flour, water and salt, I think it’s worth making a little investment and taking the time to source good bread flour. I personally use Marriages Organic Strong White Bread Flour. You can go direct or find it in many outlets including supermarkets, Amazon, and Costco. I also use an organic light rye flour, but don’t have a firm favourite. I find this brings a more wholesome flavour to the bread and also helps with the fermentation, the rise, and overall gut-health to the bread.
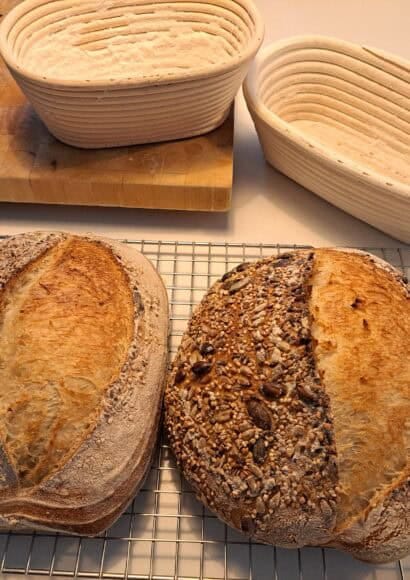
Additions and toppings
I’m either a purist – and like my loaf plain as it is – or I like to add some mixed seeds into the loaves (or rolled onto the top), for some additional depth of flavour – and upping the weekly ’30 plant’ count!
Recipes using sourdough
See below for a list of recipes, in addition to all the soup recipes, where I pair the dishes with sourdough:
- Mediterranean fish, seafood & fennel stew
- Blackberry jam
- Squid, chorizo and tomatoes on toast
- Cod, chorizo and lentil summer stew
In my recipe I’m adding 725ml of water to 1 kilo of flour and 250g of starter. When starting out on your sourdough journey, you might want to just add 650-700ml of water. The more ‘hydration’ you add to the sourdough mix, the more difficult it can be to work with. If you want to learn more about it simply search online for ‘sourdough hydration’. Simply put, standard hydration is 65-75%, whilst 75-85% is a high hydration. I’ll go up to 80%, but I personally find that 70-75% is the sweet spot for a manageable dough.
You could you bread flour, but I find that rice flour is the best solution as it’s a little more absorbent and helps the dough stick less to the basket for the 12 hours it spends in the fridge.
Honestly? I find the simplest things to use are the freebie shower caps you get in hotels!!
No, you can make this with 100% white bread flour if you wish. Or play around and introduce wholemeal, spelt… there is a lot of choice out there. But of course each flour requires different hydration. I would suggest sticking to 100% white or the 20:80 rye:white flour until you are confident.
Overnight Sourdough Bread
Equipment
- large enamel or glass bowl
- cover for your bowl
- bread baskets with covers
- bread lame blade
Ingredients
Refresh Starter
- 20g Mother
- 100g white bread flour
Sourdough Leaven
- 25g refreshed starter
- 100g white bread flour
Sourdough Bread
- 225g sourdough leaven
- 1000 g white bread flour plus extra for dusting or a mix of 800g white bread and 200g light rye flour
- 1 tbsp fine sea salt
- 1 tsp malt powder optional
- 100 g mixed bread seeds optional
- 3 tbsp rice flour
Instructions
- 10am Day One – I refresh the starter. Taking the 'mother' from the fridge, I put 20g in a large, clean, jam jar. Adding 100g of white bread flour and 100ml warm (but not hot) water, give everything a really good stir. I don't know why, but I use a chopstick for this! I find I lose less of the dough and it's easy to clean.
- Cover the jam jar, I have a reusable plastic cover, I put an elastic band around the jar to mark the height of the starter, and place in an ambient place in your kitchen until doubled in size. You don't want it to be too cold or warm – around 20-22 °C is perfect. Depending on the time of year, you'll notice that the timing of this can vary a lot. This is where you need to take your time and get used to how your dough reacts at the various stages. Your mother is perfect to use when it's doubled in size – hence the use of the elastic band to track it's growth.
- 10pm Day One – I use the refreshed starter to make my leaven. Taking 25g of the refreshed starter and placing it in a large, clean jam jar, I add in 100g white bread flour and 100ml warm water. Mix together and once again cover and leave on the worktop in the kitchen overnight. The remainder of the refreshed 'mother' goes in a sealed jar in the fridge until needed again.
- 7-8am Day Two – You should have 225g leaven ready to use to make your sourdough. Pour into a large bowl (enamel or glass), to this mix in 600ml of warm water thoroughly. Then add in 1kg flour (I use all white bread flour or opt for 200g rye flour and 800g white bread flour). At this stage you just want to mix the dough to a dry, shaggy, consistency. It won't look pretty, or anything like bread dough at this stage, but don't worry. Cover the bowl and leave to stand in the kitchen for 30 minutes. I use a large plastic cover – like a big shower cap!
- After 30 minutes, you want to slowly add more warm water until you reach 700-750ml in total. * See note below * I normally do this with 2 x 50ml and then a final 25-50ml (depending on the dough hydration). Each time, mix well, scraping the sides down, re-cover and leave for 20-30 minutes. With the final 25-50ml of water, I also sprinkle on 1 tbsp of table salt. It's optional, but to get a browner crust, I also add in 1 tsp of malt powder. If I want a seeded loaf, I would add in 100g seeds now as well. Give everything a good mix to combine and cover.
- After 15 minutes, you want to then start 'folding' your dough. Lift up the dough in the middle until the ends fold in underneath. Turn the bowl 90 degrees and repeat for 4 folds in total. You want to then repeat this every 15 mins for a total of 4 times. You should now have a smooth looking dough that's ready to prove. Leave this to double in size. There is no specific time, but anywhere from 2-4 hours, depending on the temperature in your kitchen.
- Once the dough has proven, tip it onto a floured worksurface and divide into 3 equals pieces. Shape into 3 balls, using your scraper and your hands keep pulling the ball towards you. You want to add tension to the dough at this stage. The more tension you create on the surface of the dough the more likely you are to create a good rise in your loaf. There are a tonne of videos online showing you this technique.
- Leave the shaped loaves to 'bench rest' on the worktop for 30 minutes. Prepare your baskets by dusting them liberally with rice flour. I try and press it into the ridges of the baskets. There is nothing worse than a loaf that sticks in the baskets when you try to turn them out!
- Flip your sourdough ball over, and fold in each of the 4 corners into the centre. Then roll it up into a sausage shape. I create an oblong as my baskets are this size, but you might have round baskets, in which case shape as required. Place the sourdough loaves into the floured baskets with the seamside up, squeezing together any loose seams to capture the air inside, and cover with plastic covers. Place on the top shelf of your fridge and leave overnight.
- First thing Day Three – Heat the oven to 225 °C . When the oven is at temperature, dust a non-stick baking sheet with a little flour, tip out your sourdough loaf, and brush off any excess flour from the loaf. Throw 4-5 icecubes into the bottom of the oven, to create steam, and place your loaves in the middle of the oven. Set a timer for 5 minutes.
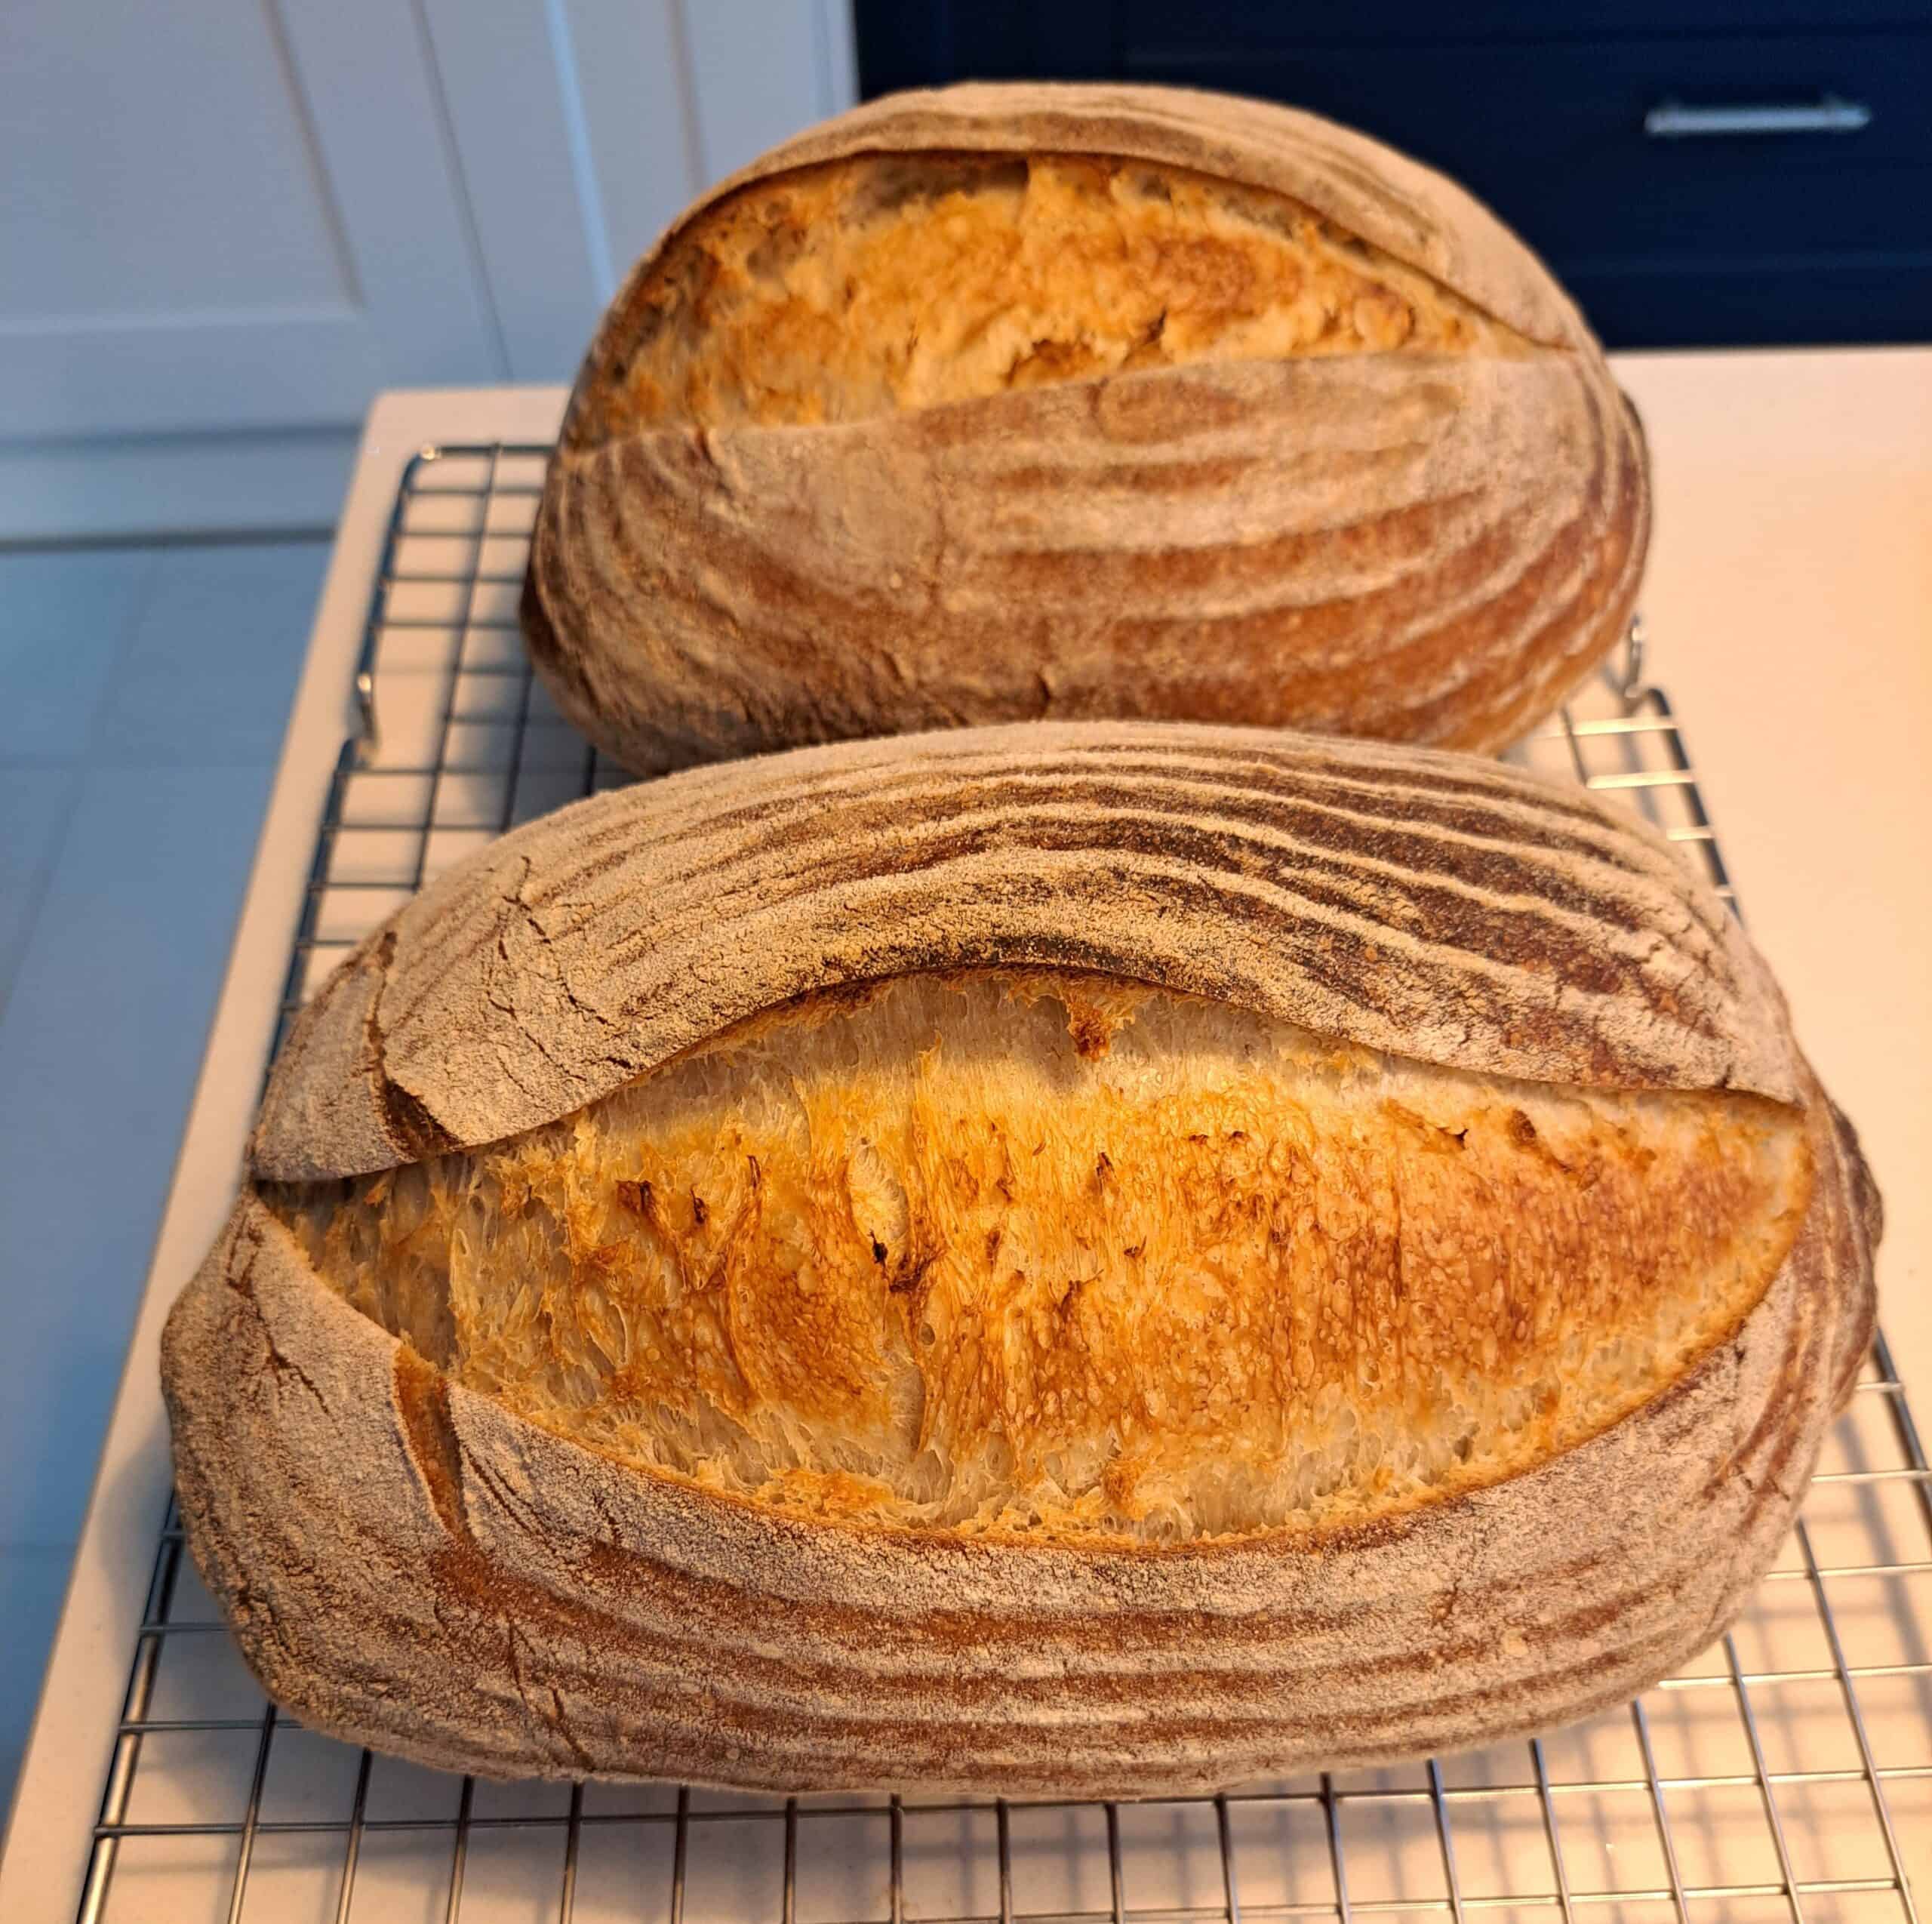
- After 5 minutes, remove from the oven and slash with your sharp lame blade from end to end. I have tried many times slashing the loaf initially before placing it in the oven with very mixed results. But allowing a slight crust to form before slashing seems to give me consistent results, and better 'ears'!! Return to the oven for 25 minutes.
- When the time is up, allow the loaves to cool for at least an hour. Freshly cooked sourdough is notoriously difficult to slice if it's too warm. Enjoy the fruits of your labour.
Notes
- I’m adding in 725-750ml of water to 1 kilo of flour and 225g of starter. When starting out on your sourdough journey, you might want to just add 700ml of water. The more ‘hydration’ you add to the sourdough the more difficult it can be to work with. If you want to learn more about it search online for ‘sourdough hydration’ and you’ll see that standard hydration is 65-75% whilst 75-85% is a high hydration. I’ll go up to 80%, but I find that 70-75% is the sweet spot for a manageable dough.
- I use rice flour to dust my baskets as I find this really helps stop the dough from sticking, but you can use bread flour.
- To cover my baskets whilst rising in the fridge, I use shower caps!